

Wall Safe Installation Instructions
Installing a wall safe – Step by Step Instruction
Before beginning your project take a few moments to read the other posts. As I discussed in my posting on selecting the location of the floor safe, many of the same principles hold true. Ensure that you target locations that are out of view and not likely see much traffic. Closets walls behind clothes hangers are a good spot for example. One point I need to make clear, a home wall safe’s greatest security is being as they say, out of sight and out of mind.
Installing a wall safe is pretty straight forward, but before you take on such a project, I recommend that you consulting with a reputable and licensed contractor before you begin.
Take moment to inspect your safe and installation hardware ensuring it is all present. Please take note that your safe mounting bolts should be a maximum length of 1½”. If they are longer, we recommend that you replace them with a similar version about 1½” in length.
Most wall safes are sized to mount between studs of standard spacing of 16” on center and within the depth of a standard wall. Storage space is increased by expanding the height of the safe. However it is possible to obtain safes both deeper and wider. Normally wall safes of these extended sizes are installed during construction or remodels due to the special installation requirements. If you do elect to install one of these extended sized wall safes, ensure that you consult a contractor for your safety as well as the success of the project. Below is a general overview of the process. Make sure you consult the manufacturer’s instruction every step of the way.
Equipment needed:
- Tape Measure
- Quality Stud finder – Consider one with electrical & plumbing detection
- Pencil and eraser
- 24” long level
- Metal Straight Edge of a length exceeding the height of the safe. 36” metal ruler is normally perfect
- Drywall knife with extra blades
- 2” Core Drill bit
- 1” to 1.5” Inspection mirror
- Small flash light (Beam head under 2” in diameter)
- 90 degree power drill
- Socket set with hand drill adaptor (Generally ½” or 9/16” socket is required)
Supplies needed:
- Making tape
- Floor cover or drop cloth to ease clean up.
- Premixed Spackle and several 4” x 4” Drywall patch kit
- Cleaning cloths or shop rags
Step 1 – Select a location for installation of your wall safe. The location should not be visible to casual observation. Inside of a closet or behind wall hangings are some choices. Also, consider how visible the safe would be while accessing it. While it may seem cool to have a wall safe install behind a large picture or wall hanging in your living room, consider how visible accessing the safe will be to folks within your home, and casual observation from outside through your exterior windows.
When selecting your location, consider what is on the other side of the wall you are considering. Also locations that appear to be empty space within a wall often mask duct work or plumbing. Some locations to avoid are:
- Walls adjacent to electrical boxes
- Bath room walls
- Near air vents
- Laundry rooms
With a tentative location selected, you will need to inspect the location to ensure that it is suitable. This inspection begins with the stud finder. Some of the higher end stud finders also incorporate detection of electrical lines and plumbing fixtures. While not strictly necessary to use a stud finder with these features, this type can save you time and spare you needless patching of inspection holes. Using the stud finder locate and lightly mark using a pencil the studs on each side of your target area. Make sure you mark the outside edges on each side of the studs. Repeat these markings at top and bottom of your selected installation area. Take a moment and measure the distance between the edges of the markings that would represent the “inside” edges of the installation area to ensure that you have the minimum required clearance. In a perfect world all studs would be 16” apart when measured from center (about 13.75” between studs), however that is not always the case.
If your stud finder is capable of detecting electrical and plumbing lines, inspect the interior of markings for indications of studs, wires, or plumbing lines. If any are detected, or if the studs are positioned too close together, then the location is not suitable and another should be selected.
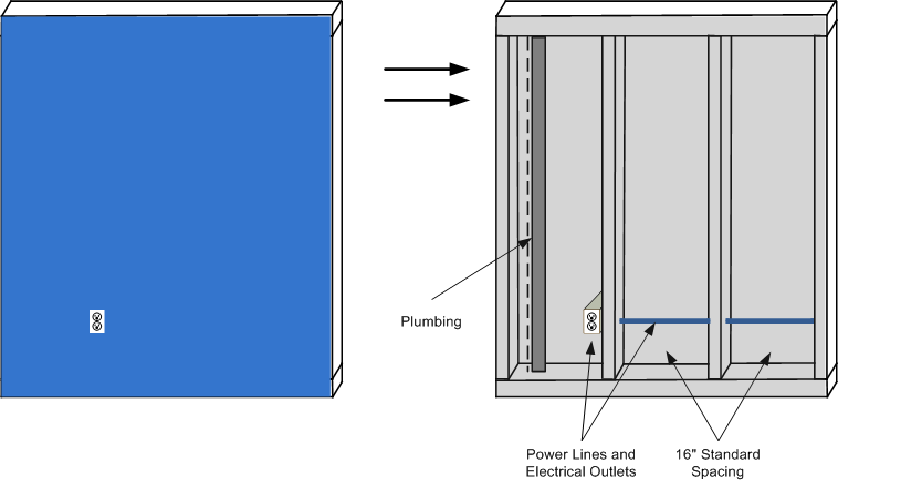
Figure 1 – Hidden behind the wall
Step 2 – Once the selected area has been inspected with the stud finder and the stud placement meets the minimal space requirements and no electrical or plumbing lines have been detected, you are ready for a visual inspection.
Note: The visual inspection requires the drilling of holes into the dry wall of the proposed installation location. If the area is determined not to be suitable, patching and painting of the dry wall will be necessary.
Taking note of the marking the “inside” edge of the studs, locate the top most right point of the installation area. Using the 2” core drill bit and the power drill carefully cut a hole about a ½” below and right of the edge of the stud. Ensure that the drill bit only penetrates to the depth of the sheet rock (normally ½”). Once the dry wall is removed, the stud should be visible to the left side of hole. At a location about ½” above and to the left of the bottom left corner of the installation area, carefully cut another hole in the same manner as the first one using the power drill and 2” core drill bit. Just like with the first hole, once the dry wall is removed, the stud should be visible to the right side of hole
Take the flash light and insert the end it into the lower hole and turn it on. Using the inspection mirror in the upper hole, visually inspect the selected installation area for any electrical or plumbing lines, duct work or any other obstructions to the installation.
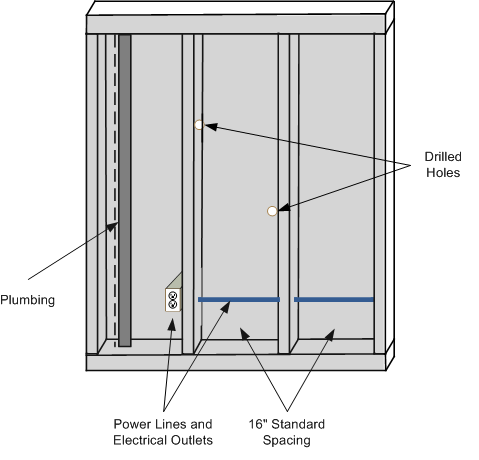
Figure 2 – Visual Inspection of Tentative Location
Step 3 – With your visual inspection complete and no obstructions found, it is time to open up your dry wall. Using your straight edge and level, take the pencil and draw a straight and level line connecting the two top points of your installation location. Checking your measurements, draw another straight and level line connecting the two bottom points. Using the “inside” edge of the studs as a guide, use the straight edge to draw the left and right limits of the installation area.
Before proceeding, double check your measurements. The marked area should be that same size as the body of the safe.
Using the metal straight edge and the dry wall knife, carefully and neatly cut the dry wall along the lines you just created. The end result should yield you an opening that your wall safe can slide into. If possible, remove the door to the safe to simplify the next few steps. Ensuring that you support the weight, carefully insert the safe as a test fit into the opening. Trim the dry wall with the knife as necessary to allow the safe to fit. The edge or frame of the safe should completely mask the opening you have made when fully inserted.
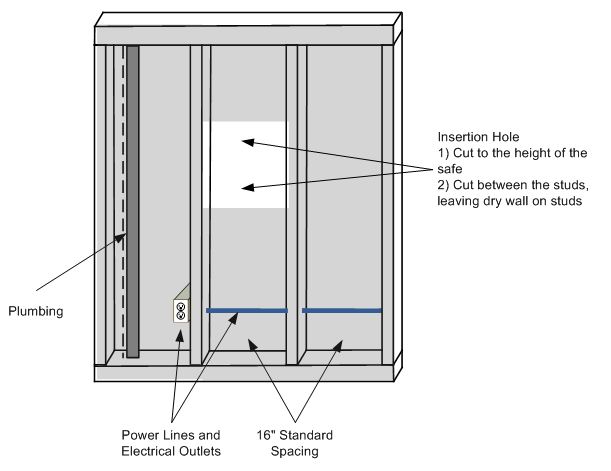
Figure 3 – Mount opening in the wall
Step 4 – Temporarily insert the safe into the mounting hole being careful to support the weight of the safe. Using the pencil, place a mark on the studs in the center of the mounting holes. Remove the safe and set it aside. Locate the mounting bolts for the safe in accordance with the manufactures instructions. Select a drill bit about two bit sizes smaller than the mounting bolt. Using the tape measure as a reference, wrap a piece of masking tape at a 90 degree angle to the drill bits length, 1 ¼” inches from the tip.
Caution: While you have done your due diligence with your visual inspection to ensure that you do not have any obstructions in the installation area, please note that there is a small but very real possibility that electrical or plumbing lines can be mounted on the outside of the studs the safe will be mounted to. This will not present a problem as long as you do not penetrate the outside of the studs with the drill bit or mounting bolts. In most cases the mount bolts provided are short for this reason, however if the bolts provided in your kit exceed a 1½” in length consider replacing them with a shorter version. A quick trip to the hardware store could save you a great deal of grief later.
Mount the drill bit into the power drill and carefully drill a hole on the marks on the studs to the depth of masking tape. Repeat this for all mounting holes marked.
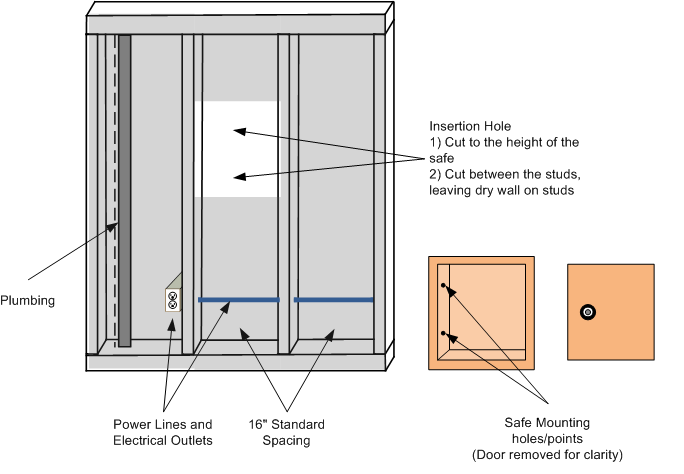
Figure 4 – Marking the Mounting Holes
Step 5 – Once the holes are drilled, the safe is ready to be mounted. Install the appropriate sized socket on the power drill. Insert the safe and using the power drill start the mounting bolts with washers. Ensure that all mounting bolts are started before tightening them completely. Run the bolts until they are flush with the inside surface of the safe being careful not to over torque!
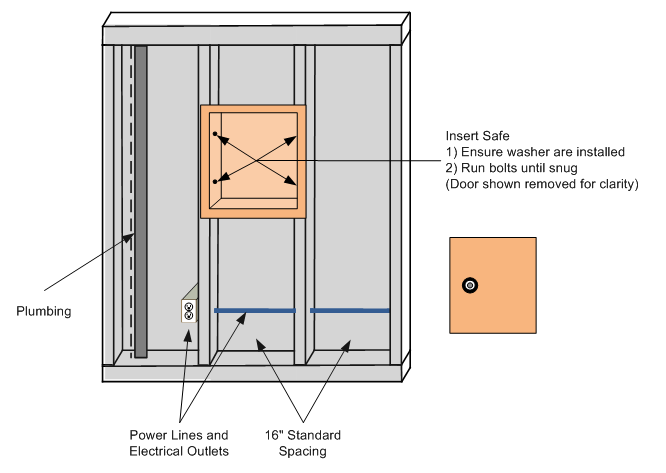
Figure 5 – Mounting the Safe
Step 6 – If the door of the safe has been removed, reinstall it. Following the manufactures instructions, set up any internal shelves and your combination.
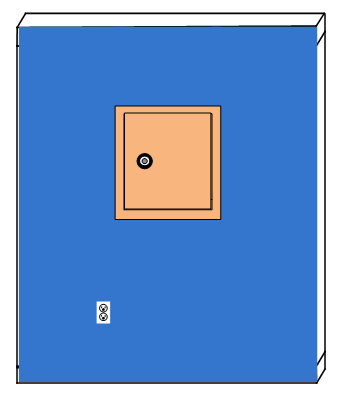
Figure 6 – Finished Installation