

In Floor Safe Installation Instructions
Installing a floor safe – Step by Step Instruction
Before beginning your project take a few moments to read the other posts. I also want to state that consulting with a reputable and licensed contractor is highly advisable before beginning to install a floor safe. Below is a general overview of the Step by Step Procedures for installing an In-Floor safe. Make sure you consult the manufacturer’s instruction every step of the way.
Equipment needed:
- Tape Measure
- 36” long level
- 6” long level
- Jack Hammer, Core Rig, or Concrete Saw
- Long handled Shovel
- Tarps or Drop Cloths
- Trough and tools for mixing of concrete
- Trowel
- Water bucket
- Wheel Barrel or other means to transport broken concrete
Supplies needed:
- Clean sand or fine gravel in excess to any required for mixing of concrete.
- Concrete
- Plastic Sheeting for use as a moisture barrier (As required by the manufactures recommendation)
- Cleaning cloths or shop rags
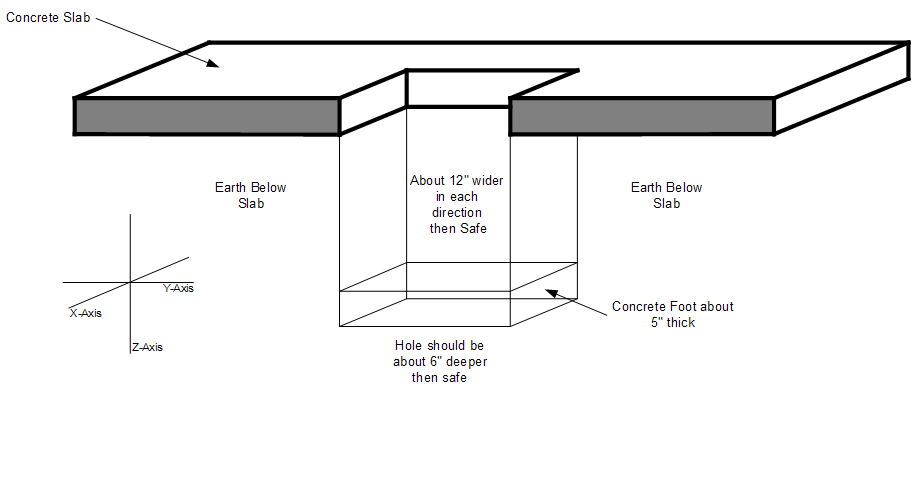
Step 1 – Select a location for the floor safe installation. Refer to http://installingafloorsafe.info/selecting-a-location-for-the-installation-of-a-floor-safe for details. You will need to cut a hole in your basement or ground floor slab to the size dimensions as per the safe’s installation instructions. In most cases the opening will need to be about 12” wider on the X and Y axis and about 6” deeper on the Z Axis. You have a number of different tools that you can use to make the opening such as Jack Hammer, Core rigs, or Concrete Saw. I recommend the Jack Hammer because clean up is easiest. The other two will kick up a great deal of dust that will travel all over your residence.

Step 2 – Once the hole is cut and dug to the recommended depth along the Z Axis, fill in the bottom of the hole with no more the 5 inches of concrete.
Caution! Over filling of the hole at this step will result in your In-Floor safe protruding out of the floor, causing both a trip hazard and making the safe difficult to conceal later.
Care must be taken to ensure that the top of the concrete to the top of the hole in the floor slab is at least an inch less than the high of the safe with dust cover installed. Carefully smooth the freshly poured concrete. Using the 6” level, ensure that concrete is level on the X & Y axis. Allow the concrete to begin to dry. Concrete must be firm enough to hold the weight of the in-floor safe before proceeding.
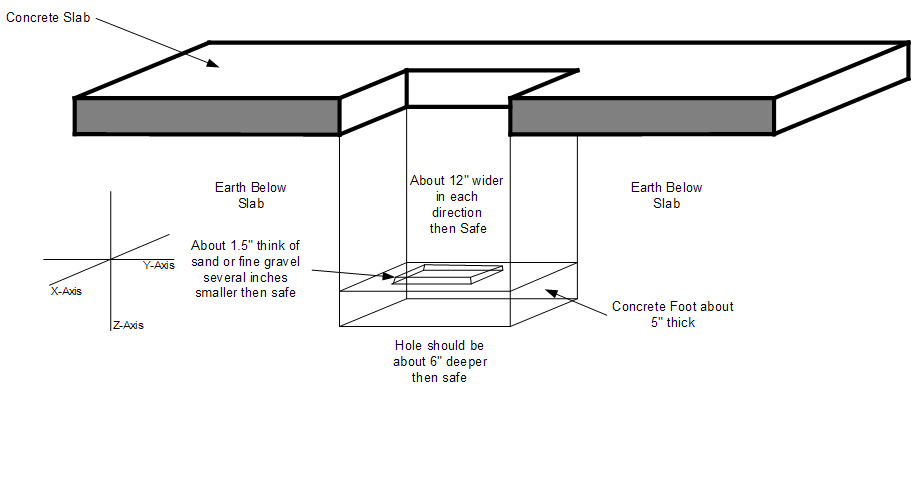
Step 3 – Once the freshly poured slab has harden to a degree that it can support the weight of the safe you are ready to proceed with next step of the floor safe installation. Start from the middle of the slab, working out bound, carefully pour about a 1.25” to 1.5” deep of the clean sand or fine gravel into the hole in a square or other appropriate shape. Make sure the final square is of sand or gravel is several inches smaller then the safe on the X and Y Axis.
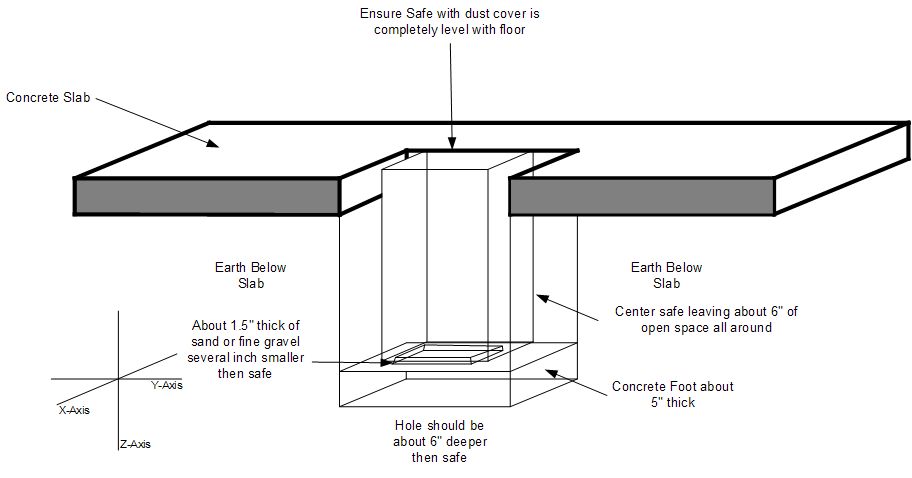
Step 4 – Prepare the in-floor safe according to the manufacturer’s instructions for installation into the hole. If the floor safe does not have a Polyethylene covered body, it will likely require that the safe be wrapped in a moisture barrier. Ensure that the dust cover is installed on the safe and carefully lower it into the hole. Center the safe in the hole along the X & Y Axis. Once centered, place the 36” level across the dust cover of the safe. At this point the top of the safe should be about 1” above the surrounding slab. Carefully apply a steady downward pressure; gently rotate the safe back and forth slightly around the Z axis until the top of the in-floor safe comes level with the surrounding slab as measured using the 36” level. Note: The dust or environmental covers to some In-floor safes add additional height to the unit. This measurement should be taken with the dust cover installed.
Verify that little or no sand / fine gravel has pushed out from under the safe. This empty space below the safe and along the edge will help seal the concrete case. If a significant amount of sand or fine gravel is present beyond the edge of the safe, it will need to be cleaned out before proceeding in the next step of the safe installation. If necessary pull the safe out, clean up the loose sand or fine gravel and repeat step 4 using less sand.
Step 5 – Carefully fill the remaining hole with concrete being careful not disturb the safe position. Once filled, using the trowel smooth the concrete even with the surrounding slab and the in-floor safe dust cover. Use the shop towels to gently clean any excess concrete from the dust cover being careful not to disturb the position of the safe. Allow the concrete to set and dry. Congratulations – you now have an installed floor safe!